Large language model-based agents are increasingly used to automate complex workflows. However, as their responsibilities grow, managing the size of the prompt context becomes a challenge. Loading every standard operating procedure, reference guide, and document into the persistent context window is not sustainable: it consumes valuable tokens, dilutes the model’s focus, and increases the likelihood of incorrect responses.
To address this, we added support for Agent Skills in Genkit for TypeScript, Go, Dart, and Python. This post will illustrate how to use Agent Skills with Genkit in Go. The agent skills standard lets developers package specialized expertise into discoverable capabilities that the agent loads only when needed. They act as specialized knowledge packs that remain in the background until the moment they are required.
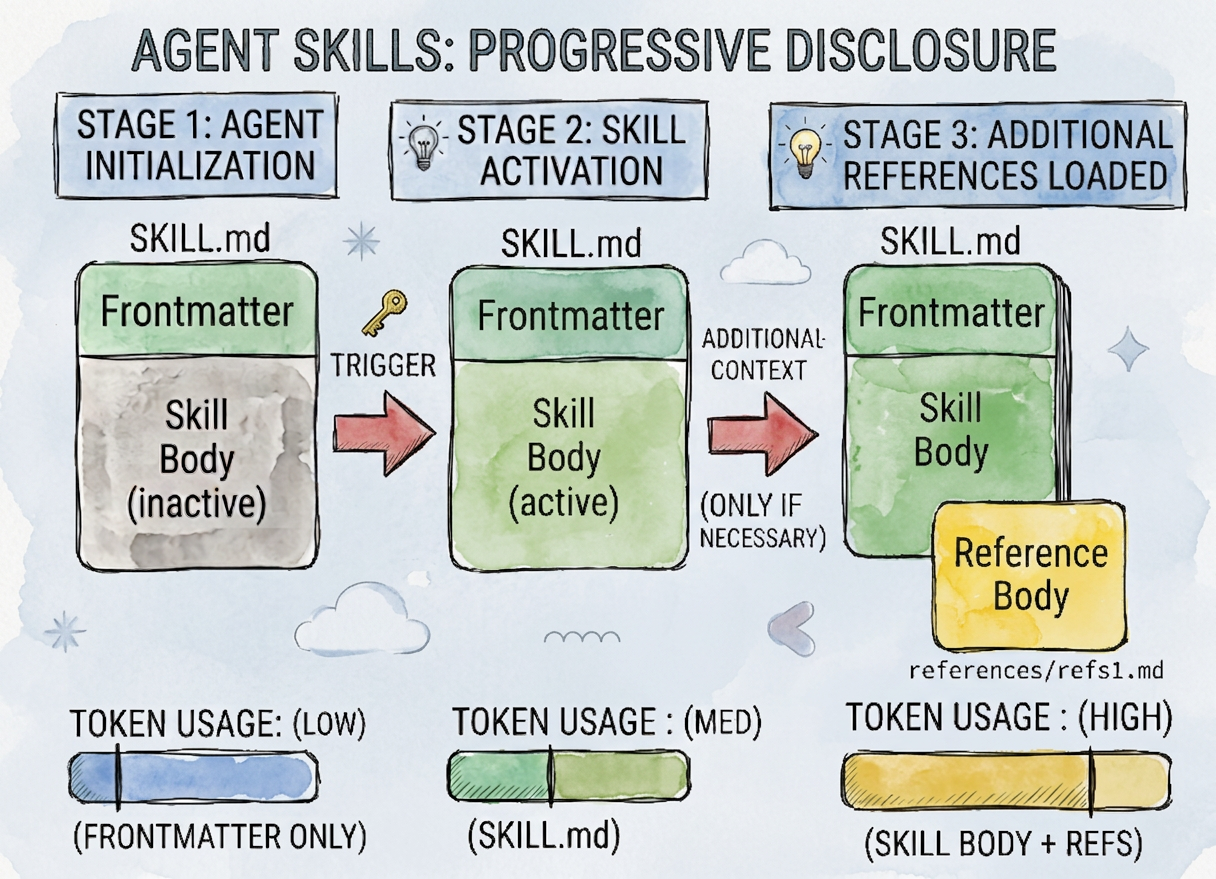
Agent skills operate on a principle called progressive disclosure, meaning information will only be revealed to the model when it is necessary. Skills are defined using a SKILL.md file that has two sections: frontmatter and body. The frontmatter contains the skill description and any additional metadata. The body of the skill is the part that contains the actual instructions to the model. Additionally, it is possible to add supplementary files like references or scripts as well.
Following the specification, this is how a skill is organized on disk:
skill-name/
├── SKILL.md          # Required: metadata + instructions
├── scripts/          # Optional: executable code
├── references/       # Optional: documentation
├── assets/           # Optional: templates, resources
└── ... # Any additional files or directoriesAnd here is a skill frontmatter example:
---
name: adr-template
description: Activate this skill when proposing significant architectural changes, documenting codebase refactorings, or resolving design/technical debates. Use this skill to author and maintain Architecture Decision Records (ADRs) to preserve engineering context.
license: Apache-2.0
metadata:
  author: example-org
  version: "1.0"
---At first, the agent harness will load the skill definition from the SKILL.md file, but only expose the frontmatter to the agent's system prompt. This is the information it needs to know to consider if the skill must be activated or not. As the conversation evolves, eventually the agent will hit a circumstance where that skill might be needed, and the activation process will start, loading the full body of the skill. Based on the body content, the agent might decide to load additional references or use bundled scripts, completing the disclosure cycle for that given task.
This flow is summarized in the following diagram:
This progressive disclosure model offers three key advantages:
To understand how Agent Skills operate in Genkit Go, we must first look at the Genkit middleware architecture. Genkit middleware acts as a pipeline of hooks that intercept and wrap crucial model lifecycle phases:
Agent Skills build on this hook system. By monitoring incoming prompts, the middleware detects matching descriptions and activates skills dynamically.
Here is a code snippet demonstrating how you can add skill support to your Genkit flow:
resp, err := genkit.Generate(ctx, g,
    ai.WithPrompt("How do I run tests in this repo?"),
    ai.WithUse(&middleware.Skills{SkillPaths: []string{"./skills"}}),
)Skill usage happens in three distinct stages:
To get started with Agent Skills in Genkit, first ensure you have the latest version of the Genkit Go SDK:
go get github.com/firebase/genkit/goThis step is optional, but recommended. On macOS or Linux, run:
curl -sL cli.genkit.dev | bashOn Windows, download the binary from: cli.genkit.dev
More details can be found at https://cli.genkit.dev
With the SDK installed, you can register the skills middleware and provide it during a Generate call. The following code sample defines a recipe generation command-line tool powered by a Genkit flow:
package main

import (
	"context"
	"fmt"
	"log"
	"os"

	"github.com/firebase/genkit/go/ai"
	"github.com/firebase/genkit/go/genkit"
	"github.com/firebase/genkit/go/plugins/googlegenai"
	"github.com/firebase/genkit/go/plugins/middleware"
	"google.golang.org/genai"
)

func main() {
	if len(os.Args) < 2 {
		fmt.Println("Usage: recipe <food|ingredient>")
		os.Exit(1)
	}

	input := os.Args[1]

	ctx := context.Background()

	g := genkit.Init(ctx, genkit.WithPlugins(&googlegenai.GoogleAI{}, &middleware.Middleware{}))

	recipeFlow := genkit.DefineFlow(g, "recipeFlow", func(ctx context.Context, input string) (string, error) {
		prompt := fmt.Sprintf("Provide a recipe using %s", input)

		return genkit.GenerateText(ctx, g,
			ai.WithModel(googlegenai.ModelRef("googleai/gemini-flash-latest", &genai.GenerateContentConfig{
				ThinkingConfig: &genai.ThinkingConfig{
					ThinkingLevel: genai.ThinkingLevelLow,
				},
			})),
			ai.WithSystem(
				"You are a professional chef assistant with wide knowledge about recipes. "+
					"The user will give you a food or ingredient and you need to respond with a recipe. "+
					"Use specialized knowledge (skills) whenever possible. "+
					"Respond with ASCII formatting optimized for terminal output (no markdown).",
			),
			ai.WithPrompt(prompt),
			ai.WithUse(&middleware.Skills{SkillPaths: []string{"./skills"}}),
		)
	})

	result, err := recipeFlow.Run(ctx, input)
	if err != nil {
		log.Fatalf("Error running flow: %v", err)
	}

	fmt.Println(result)
}Note that we configure the Skills middleware with the ai.WithUse functional option in genkit.GenerateText. In the instantiated Skills middleware, we map the ./skills folder via SkillPaths, which in this example contains two skills: "banana-bread" and "cheese-bread".
Running the application with the word "cheese" activates the "cheese-bread" skill and returns the corresponding recipe:
$ go run main.go cheese
+-------------------------------------------------------------+
|               TRADITIONAL BRAZILIAN CHEESE BREAD            |
|                        (Pao de Queijo)                      |
+-------------------------------------------------------------+

Naturally gluten-free, crispy on the outside, and chewy inside.

===============================================================
INGREDIENTS
===============================================================
* Tapioca Flour (Sour Starch) .. 2 cups (240g)
* Whole Milk .................. 1/2 cup (120ml)
* Water ....................... 1/2 cup (120ml)
* Vegetable Oil ............... 1/3 cup (80ml)
* Salt ........................ 1 tsp
* Eggs (Room Temp) ............ 2 large
* Grated Parmesan/Queijo ...... 1.5 cups (150g)

===============================================================
EQUIPMENT
===============================================================
* Medium saucepan
* Mixing bowl or Stand mixer with paddle attachment
* Baking sheet with parchment paper
* Ice cream scoop (optional)

===============================================================
INSTRUCTIONS
===============================================================

1. SCALD THE STARCH
 - Place the tapioca flour in a large mixing bowl.
 - In a saucepan, bring milk, water, oil, and salt to a boil.
 - Immediately pour the boiling liquid over the tapioca flour.
 - Stir with a wooden spoon until a lumpy, sticky dough forms.
 - Let it cool for 5-10 minutes until warm (not hot).

2. INCORPORATE EGGS & CHEESE
 - Add the eggs one at a time, mixing thoroughly after each.
 - Mix in the grated cheese until the dough is cohesive and glossy.

3. SHAPE & PORTION
 - Preheat your oven to 400 deg F (200 deg C).
 - Grease your hands with oil to handle the sticky dough.
 - Roll into 1 to 1.5-inch balls.
 - Place on a baking sheet lined with parchment paper.

4. BAKE
 - Bake for 15 to 20 minutes until puffed and lightly golden.
 - Serve warm!

===============================================================
PRO TIP: You can freeze the unbaked dough balls on a tray, then store them in a bag.
Bake directly from frozen for 25 mins!
===============================================================You can view the skill content and download the complete code for this example here.
While the recipe flow demonstrates basic on-demand loading, production systems need agents to orchestrate and apply specialized instructions to non-deterministic tasks. Here is a multi-modal art restoration application built with Genkit Go and Gemini 3.1 Flash Image (Nano Banana 2):
package main
import (
"context"
"encoding/base64"
"fmt"
"log"
"log/slog"
"os"
"path/filepath"
"strings"
"github.com/firebase/genkit/go/ai"
"github.com/firebase/genkit/go/genkit"
"github.com/firebase/genkit/go/plugins/googlegenai"
"github.com/firebase/genkit/go/plugins/middleware"
"google.golang.org/genai"
)
// Input defines the schema for the Renaissance flow, accepting a Base64 image data URI.
type Input struct {
URL string `json:"url"`
}
// Output defines the schema for the flow output, containing both text explanation and image data.
type Output struct {
Text string `json:"text"`
Image string `json:"image"` // Base64 image data URI
}
func main() {
// Configure logging to suppress verbose Genkit trace and info logs on standard output.
logger := slog.New(slog.NewTextHandler(os.Stderr, &slog.HandlerOptions{
Level: slog.LevelError,
}))
slog.SetDefault(logger)
if len(os.Args) < 2 {
log.Fatalf("Usage: go run . <path-to-image>")
}
filePath := os.Args[1]
// Read and convert the image to a Base64 Data URI.
data, err := os.ReadFile(filePath)
if err != nil {
log.Fatalf("Failed to read file: %v", err)
}
dataURI := "data:image/jpeg;base64," + base64.StdEncoding.EncodeToString(data)
ctx := context.Background()
// 1. Initialize Genkit with standard Google AI and Middleware plugins.
g := genkit.Init(ctx, genkit.WithPlugins(
&googlegenai.GoogleAI{},
&middleware.Middleware{},
))
// 2. Define a Genkit Flow for actual image-to-image restoration.
renaissanceFlow := genkit.DefineFlow(g, "renaissanceFlow", func(ctx context.Context, input Input) (Output, error) {
// 3. Prompt the model with multimodal input and configure it to output both TEXT and IMAGE modalities.
resp, err := genkit.Generate(ctx, g,
ai.WithModel(googlegenai.ModelRef("googleai/gemini-3.1-flash-image", &genai.GenerateContentConfig{
ResponseModalities: []string{"TEXT", "IMAGE"},
})),
ai.WithSystem("You are Renaissance, a multimodal art restoration AI. First, analyze the image to determine "+
"the type of image, then invoke the corresponding restoration skills as appropriate. "+
"Finally, perform a highly precise restoration and output the restored IMAGE. "+
"REQUIRED: In your response, return a text part summarizing your process and "+
"naming any skills used. ",
),
ai.WithMessages(
ai.NewUserMessage(
ai.NewTextPart("Please restore this image using the appropriate techniques."),
ai.NewMediaPart("image/jpeg", input.URL),
),
),
// Load agent skills dynamically from the "./skills" directory.
ai.WithUse(&middleware.Skills{SkillPaths: []string{"./skills"}}),
)
if err != nil {
return Output{}, err
}
// Return both the explanation and the generated media content (image data URI).
return Output{
Text: resp.Text(),
Image: resp.Media(),
}, nil
})
// 4. Run the flow with the prepared input.
fmt.Println("Running renaissanceFlow...")
result, err := renaissanceFlow.Run(ctx, Input{URL: dataURI})
if err != nil {
log.Fatalf("Flow execution failed: %v", err)
}
// 5. Render the textual restoration plan if it is actual text and not the raw image data.
if result.Text != "" && !strings.HasPrefix(result.Text, "data:") {
fmt.Printf("\nRestoration Plan:\n%s\n", result.Text)
} else {
fmt.Println("\nRestoration process completed (no separate textual explanation returned).")
}
// 6. Parse, decode, and save the output image locally.
if !strings.HasPrefix(result.Image, "data:") {
log.Fatalf("Unsupported or invalid image format returned by the flow")
}
parts := strings.Split(result.Image, ";base64,")
if len(parts) != 2 {
log.Fatalf("Invalid data URI format received from flow")
}
decodedImage, err := base64.StdEncoding.DecodeString(parts[1])
if err != nil {
log.Fatalf("Failed to decode restored image base64 data: %v", err)
}
ext := filepath.Ext(filePath)
base := filePath[:len(filePath)-len(ext)]
outputPath := base + "_restored.png"
err = os.WriteFile(outputPath, decodedImage, 0644)
if err != nil {
log.Fatalf("Failed to write output image file: %v", err)
}
// 7. Print the completion confirmation.
fmt.Printf("\nSuccessfully saved restored image to %s\n", outputPath)
}This application is bundled with three skills: drawings, paintings, and photography, as each distinct art style requires its own set of custom instructions for restoration. As an example, here is the SKILL.md file for the paintings skill:
---
name: paintings
description: Restoration protocol for fine art paintings.
---

# Painting restoration

Perform direct, minimal-intervention restoration of fine art paintings. Prioritize historical integrity, original pigment depth, and surface textures over cosmetic modernization. Do not include any elements, nor introduce any techniques not present in the original piece.

### 1. Core conservation mandates
* **Absolute Fidelity:** Strictly forbidden to add new subjects, figures, scenery, details, or narrative elements under any circumstances.
* **Anti-Modernization:** Retain original brushstroke characteristics. Do not flatten support textures.
* **Patina & Craquelure:** Respect the natural crack network (craquelure) as part of the artwork's history. Do not fill or erase cracks unless they pose an active risk of paint loss.

### 2. Step-by-step restoration process
1. **Varnish Correction:** Gently balance aged, yellowed natural varnishes to recover original pigment chromaticity without forcing modern, high-contrast saturation.
2. **Soot & Grime Reduction:** Isolate and lift surface grime while protecting delicate, thin underlying glaze layers.
3. **Inpaint Major Loss:** Where paint layers are missing, use references from the surviving elements to bridge the gap. Replicate the original brush direction, speed, height, transparency, and light source.Let's run this application giving it a painting to see it in action. This is "Ecce Homo", by Elías García Martínez, before its infamous restoration attempt:
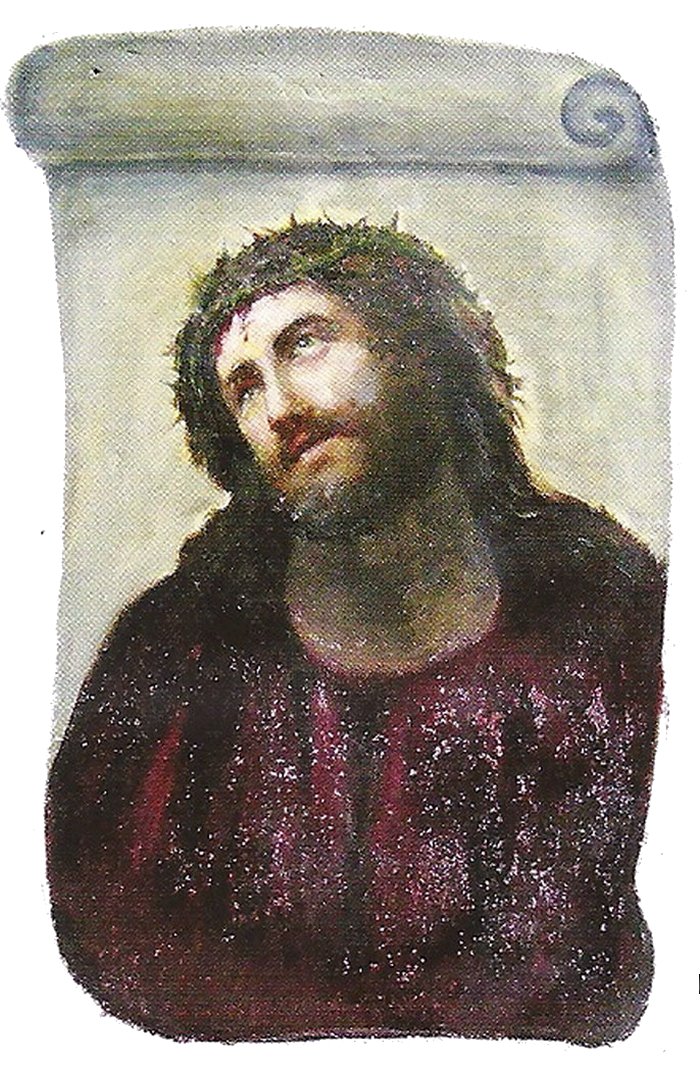
With this file saved as ecce_homo.png, run the application (note: you will need a GEMINI_API_KEY configured on your environment to run this example):
go run main.go ecce_homo.pngHere is the terminal output:
$ go run main.go ecce_homo.png
Running renaissanceFlow...

Restoration Plan:
*   **Process:** I identified the image as an antique religious painting, specifically a devotional portrait of Jesus Christ as the Man of Sorrows (Ecce Homo). The restoration process focused on simulating a precise physical conservation. First, surface cleaning was emulated to remove layers of grime and dulled, yellowed varnish, which revealed the original vibrant deep reds and rich, dark skin tones. This improved color fidelity and value contrast. Second, the structural integrity of the canvas or panel was addressed by minimizing non-artistic cracks and visible canvas weave (craquelure), particularly across the face and upper garment, making the portrait sharper and more coherent while retaining a sense of age. The distinctive textured purple robe with speckles of light was preserved, with only the largest, distracting surface blemishes removed. Finally, the scroll-like background structure, which was originally pale and indistinct, was reinforced by refining the scroll scrollwork and adding realistic, antique parchment texture and localized aging, making it a clear visual frame that integrated well with the portrait.

*   **Skills Used:** `paintings`.

Successfully saved restored image to ecce_homo_restored.pngAs indicated by the terminal output, the model correctly identified the image as a painting and activated the appropriate skill for restoration. Here is the restoration result:

Please note that given the non-deterministic nature of large language models it might take a few tries for you to get a good result. The restoration skill presented here is also an early effort and could use professional tuning.
You can download the complete code for this example here. Experiment by giving it other types of images, such as photographs and drawings, to see it activating the respective skills.
Follow these practices to optimize your Agent Skills integration:
Agent Skills provide a modular, scalable framework for managing developer expertise in Genkit Go. Integrating the skills middleware helps your applications execute complex, multi-step tasks with higher reliability.
Ready to build your first skill-enabled Genkit application?
The Go Gopher mascot was created by Renee French and is licensed under the Creative Commons 4.0 Attribution License.