Gemma 是开放模型系列,与 Gemini 模型基于相同的研究成果和技术构建而成。Gemma 模型能够执行广泛的任务,包括文本生成、代码补全和生成、针对特定任务进行微调以及在各种设备上运行。
Ray 是一个用于扩展 AI 和 Python 应用的开源框架。Ray 提供的基础设施可为您的机器学习 (ML) 工作流执行分布式计算和并行处理。
本教程结束时,您将深入了解如何在 Ray on Vertex AI 上使用受 Gemma 监督的调整功能来高效且有效地训练并提供机器学习模型。
您可以在 GitHub 上浏览“开始在 Ray on Vertex AI 上使用 Gemma”教程笔记本,以详细了解 Ray 上的 Gemma。以下所有代码都在此笔记本上,旨在让您的旅程更轻松。
无论您的环境如何,都需要执行以下步骤。
2. 确保已为您的项目启用计费。
3. 启用 API。
如果您在本地运行本教程,则需要安装 Cloud SDK。
本教程使用 Google Cloud 的计费组件:
了解定价,使用价格计算器生成预计使用量的费用估算。
我们将使用 Extreme Summarization (XSum) 数据集,这是一个关于抽象单文档摘要系统的数据集。
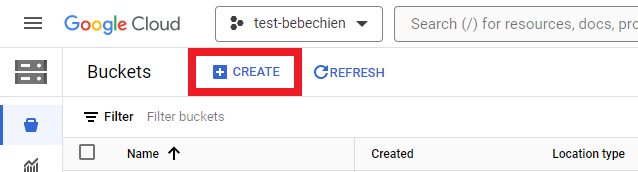
您必须创建 Cloud Storage 存储分区,以存储数据集等中间工件。
或使用 Google Cloud CLI
gsutil mb -l {REGION} -p {PROJECT_ID} {BUCKET_URI}
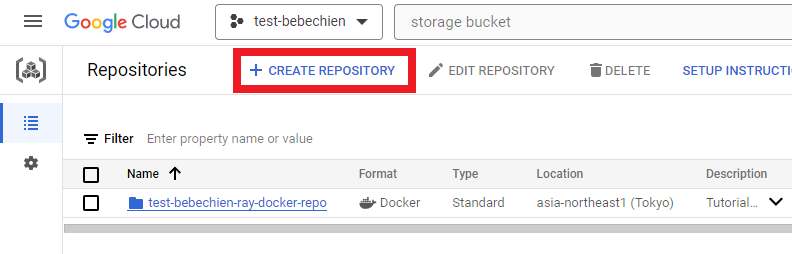
# for example: gsutil mb -l asia-northeast1 -p test-bebechien gs://test-bebechien-ray-bucket要存储自定义集群图像,请在 Artifact Registry 中创建 Docker 图像库。
或使用 Google Cloud CLI
gcloud artifacts repositories create your-repo --repository-format=docker --location=your-region --description="Tutorial repository"TensorBoard 实例用于跟踪和监控您的调整作业。您可以从实验中创建一个实例。

或使用 Google Cloud CLI
gcloud ai tensorboards create --display-name your-tensorboard --project your-project --region your-region要开始使用 Ray on Vertex AI,您可以选择从头开始为自定义图像创建 Dockerfile,也可以使用其中一个预先构建的 Ray 基础图像。请点击此处查看这样的基础图像。
首先,准备 requirements 文件,其中包含 Ray 应用需要运行的依赖项。
然后,利用其中一个预先构建的 Ray on Vertex AI 基础图像,为自定义图像创建 Dockerfile。
最后,使用 Cloud Build 构建 Ray 集群自定义图像。
gcloud builds submit --region=your-region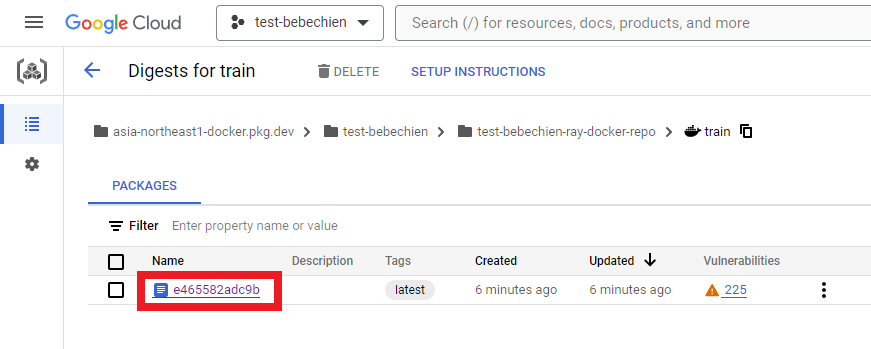
--tag=your-region-docker.pkg.dev/your-project/your-repo/train --machine-type=E2_HIGHCPU_32 ./dockerfile-path如果一切顺利,您将看到自定义图像被成功推送到 Docker 图像库。
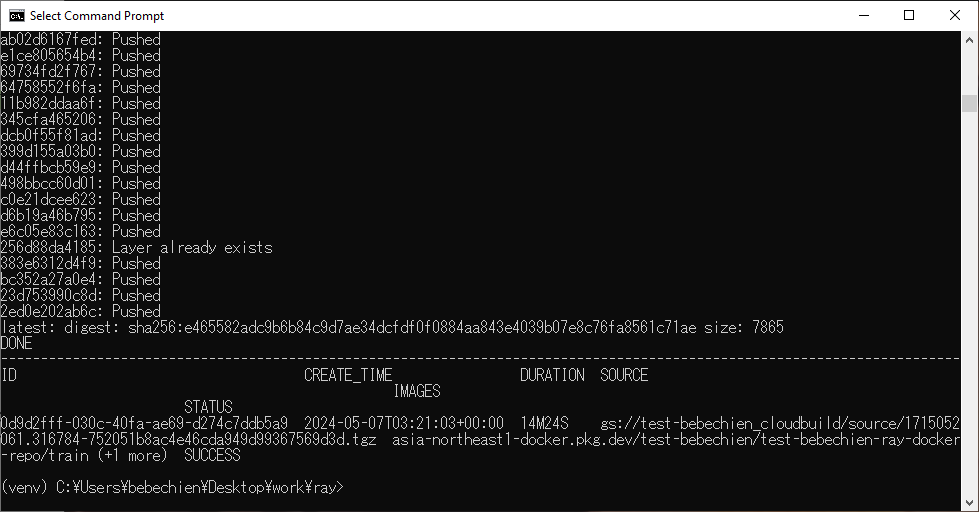
在您的 Artifact Registry 上也是如此
您可以从 Ray on Vertex AI 创建 Ray 集群。
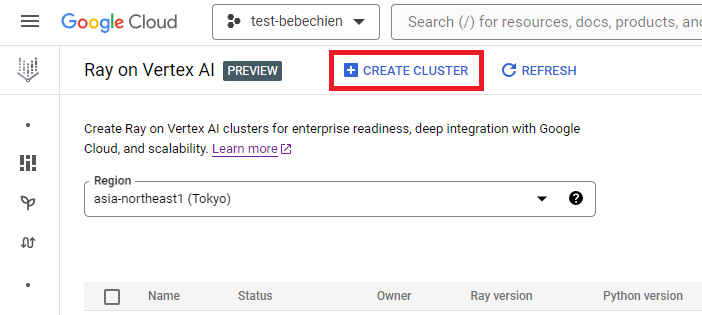
或者使用 Vertex AI Python SDK 创建含有自定义图像的 Ray 集群并自定义集群配置。如需详细了解集群配置,请参阅文档。
以下是使用预定义的自定义配置创建 Ray 集群的示例 Python 代码。
注意:创建集群可能需要几分钟时间,具体取决于集群配置。
# 在 Vertex AI 上设置 Ray
import vertex_ray
from google.cloud import aiplatform as vertex_ai
from vertex_ray import NodeImages, Resources

# 根据 TensorBoard ID 检索现有的托管 TensorBoard
tensorboard = vertex_ai.Tensorboard(your-tensorboard-id, project=your-project, location=your-region)

# 为您的项目初始化 Vertex AI SDK for Python
vertex_ai.init(project=your-project, location=your-region, staging_bucket=your-bucket-uri, experiment_tensorboard=tensorboard)


HEAD_NODE_TYPE = Resources(
    machine_type= "n1-standard-16",
    node_count=1,
)

WORKER_NODE_TYPES = [
    Resources(
        machine_type="n1-standard-16",
        node_count=1,
        accelerator_type="NVIDIA_TESLA_T4",
        accelerator_count=2,
    )
]

CUSTOM_IMAGES = NodeImages(
    head="your-region-docker.pkg.dev/your-project/your-repo/train",
    worker="your-region-docker.pkg.dev/your-project/your-repo/train",
)

ray_cluster_name = vertex_ray.create_ray_cluster(
    head_node_type=HEAD_NODE_TYPE,
    worker_node_types=WORKER_NODE_TYPES,
    custom_images=CUSTOM_IMAGES,
    cluster_name=”your-cluster-name”,
)现在,您可以使用 get_ray_cluster() 获取 Ray 集群。如果要查看与项目相关的所有集群,请使用 list_ray_clusters()。
ray_clusters = vertex_ray.list_ray_clusters()
ray_cluster_resource_name = ray_clusters[-1].cluster_resource_name
ray_cluster = vertex_ray.get_ray_cluster(ray_cluster_resource_name)

print("Ray cluster on Vertex AI:", ray_cluster_resource_name)要利用 Ray on Vertex AI 对 Gemma 进行微调,您可以使用 Ray Train,通过 PyTorch 训练完成 HuggingFace Transformer 分发,如下所示。
使用 Ray Train,您可以定义一个训练函数,其中包含用于调整要分发的 Gemma 的 HuggingFace Transformer 代码。接下来,您需要定义缩放配置,以指定所需的工作器数量,并指示分布式训练过程是否需要使用 GPU。此外,您还可以定义运行时配置,以指定检查点和同步行为。最后,通过启动 TorchTrainer 提交微调,并使用相应的拟合方法运行 TorchTrainer。
在本教程中,我们将对 Gemma 2B (gemma-2b-it) 进行微调,以便在 Ray on Vertex AI 上使用 HuggingFace Transformer 获取报纸文章的摘要。我们编写了一个简单的 Python trainer.py 脚本,并将其提交给 Ray 集群。
我们需要准备训练脚本。下面是使用 HuggingFace TRL 库初始化 Gemma 微调的示例 Python 脚本。
接下来,准备分布式训练脚本。以下是用于执行 Ray 分布式训练作业的示例 Python 脚本。
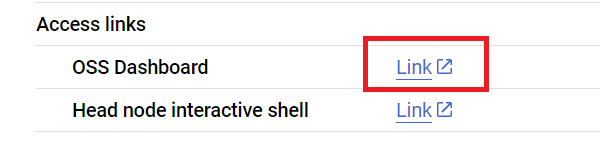
现在,我们需要使用 Ray Jobs API 通过 Ray 仪表板地址将脚本提交到 Ray 集群。您还可以在集群详情页面上找到仪表板地址,如下所示。
首先,启动客户端以提交作业。
import ray
from ray.job_submission import JobSubmissionClient

client = JobSubmissionClient(
    address="vertex_ray://{}".format(ray_cluster.dashboard_address)
)我们来设置一些作业配置,包括模型路径、作业 ID、预测进入点等。
import random, string, datasets, transformers
from etils import epath
from huggingface_hub import login


# Initialize some libraries settings
login(token=”your-hf-token”)
datasets.disable_progress_bar()
transformers.set_seed(8)

train_experiment_name = “your-experiment-name”
train_submission_id = “your-submission-id”
train_entrypoint = f"python3 trainer.py --experiment-name={train_experiment_name} --logging-dir=”your-bucket-uri/logs” --num-workers=2 --use-gpu"
train_runtime_env = {
    "working_dir": "your-working-dir",
    "env_vars": {"HF_TOKEN": ”your-hf-token”, "TORCH_NCCL_ASYNC_ERROR_HANDLING": "3"},
}提交作业
train_job_id = client.submit_job(
    submission_id=train_submission_id,
    entrypoint=train_entrypoint,
    runtime_env=train_runtime_env,
)通过 OSS 仪表板检查作业的状态。

使用 Ray on Vertex AI 开发 AI/ML 应用有各种好处。在这种情况下,您可以使用 Cloud Storage 来方便地存储模型检查点、指标等。这样,您便可以快速使用模型完成 AI/ML 下游任务,包括使用 Vertex AI TensorBoard 监控训练过程或使用 Ray Data 生成批量预测。
在 Ray 训练作业运行时以及完成后,您可以使用 Google Cloud CLI 查看 Cloud Storage 位置的模型工件。
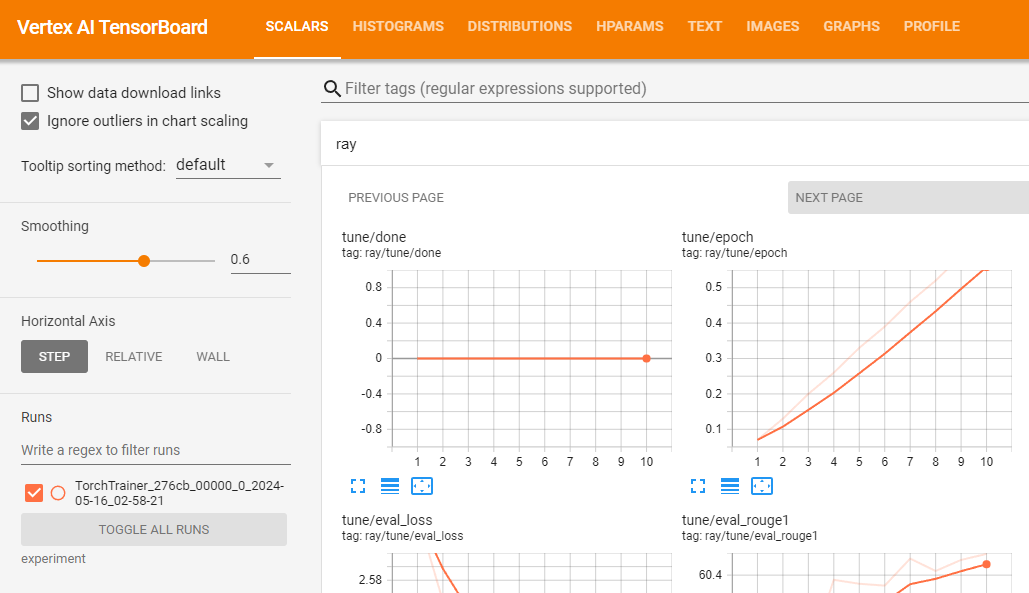
gsutil ls -l your-bucket-uri/your-experiments/your-experiment-name您可以使用 Vertex AI TensorBoard 验证您的训练作业并记录生成的指标。
vertex_ai.upload_tb_log(
    tensorboard_id=tensorboard.name,
    tensorboard_experiment_name=train_experiment_name,
    logdir=./experiments,
)
假设训练运行成功,您可以在本地生成预测,以验证经过调整的模型。
首先,使用 Google Cloud CLI 下载通过 Ray 作业生成的所有检查点。
# copy all artifacts
gsutil ls -l your-bucket-uri/your-experiments/your-experiment-name ./your-experiment-path根据相关指标和模式,使用 ExperimentAnalysis 方法检索最佳检查点。
import ray
from ray.tune import ExperimentAnalysis

experiment_analysis = ExperimentAnalysis(“./your-experiment-path”)
log_path = experiment_analysis.get_best_trial(metric="eval_rougeLsum", mode="max")
best_checkpoint = experiment_analysis.get_best_checkpoint(
    log_path, metric="eval_rougeLsum", mode="max"
)现在,您便可以知道哪个是最佳检查点。下面是一个示例输出。

以及按照 Hugging Face 文档中的说明加载微调后的模型。
下面是示例 Python 代码,用于加载基础模型并将适配器合并到基础模型中,以便您可以像使用正常的 Transformer 模型一样使用该模型。您可以在 tuned_model_path 中找到已保存的经过调整的模型。例如,“tutorial/models/xsum-tuned-gemma-it”
import torch
from etils import epath
from transformers import AutoModelForCausalLM, AutoTokenizer
from peft import PeftModel

base_model_path = "google/gemma-2b-it"
peft_model_path = epath.Path(best_checkpoint.path) / "checkpoint"
tuned_model_path = models_path / "xsum-tuned-gemma-it"

tokenizer = AutoTokenizer.from_pretrained(base_model_path)
tokenizer.padding_side = "right"

base_model = AutoModelForCausalLM.from_pretrained(
    base_model_path, device_map="auto", torch_dtype=torch.float16
)
peft_model = PeftModel.from_pretrained(
    base_model,
    peft_model_path,
    device_map="auto",
    torch_dtype=torch.bfloat16,
    is_trainable=False,
)

tuned_model = peft_model.merge_and_unload()
tuned_model.save_pretrained(tuned_model_path)Tidbit:由于您对模型进行了微调,所以您也可以使用这一行代码将其发布到 Hugging Face Hub。
tuned_model.push_to_hub("my-awesome-model")要使用经过调整的模型生成摘要,请使用教程数据集的验证集。
下面的 Python 代码示例演示了如何从数据集中抽取一篇文章进行总结、生成相关摘要以及同时打印数据集中的引用摘要和生成的摘要。
import random, datasets
from transformers import pipeline
dataset = datasets.load_dataset(
"xsum", split="validation", cache_dir=”./data”, trust_remote_code=True
)
sample = dataset.select([random.randint(0, len(dataset) - 1)])
document = sample["document"][0]
reference_summary = sample["summary"][0]
messages = [
{
"role": "user",
"content": f"Summarize the following ARTICLE in one sentence.\n###ARTICLE: {document}",
},
]
prompt = tokenizer.apply_chat_template(
messages, tokenize=False, add_generation_prompt=True
)
tuned_gemma_pipeline = pipeline(
"text-generation", model=tuned_model, tokenizer=tokenizer, max_new_tokens=50
)
generated_tuned_gemma_summary = tuned_gemma_pipeline(
prompt, do_sample=True, temperature=0.1, add_special_tokens=True
)[0]["generated_text"][len(prompt) :]
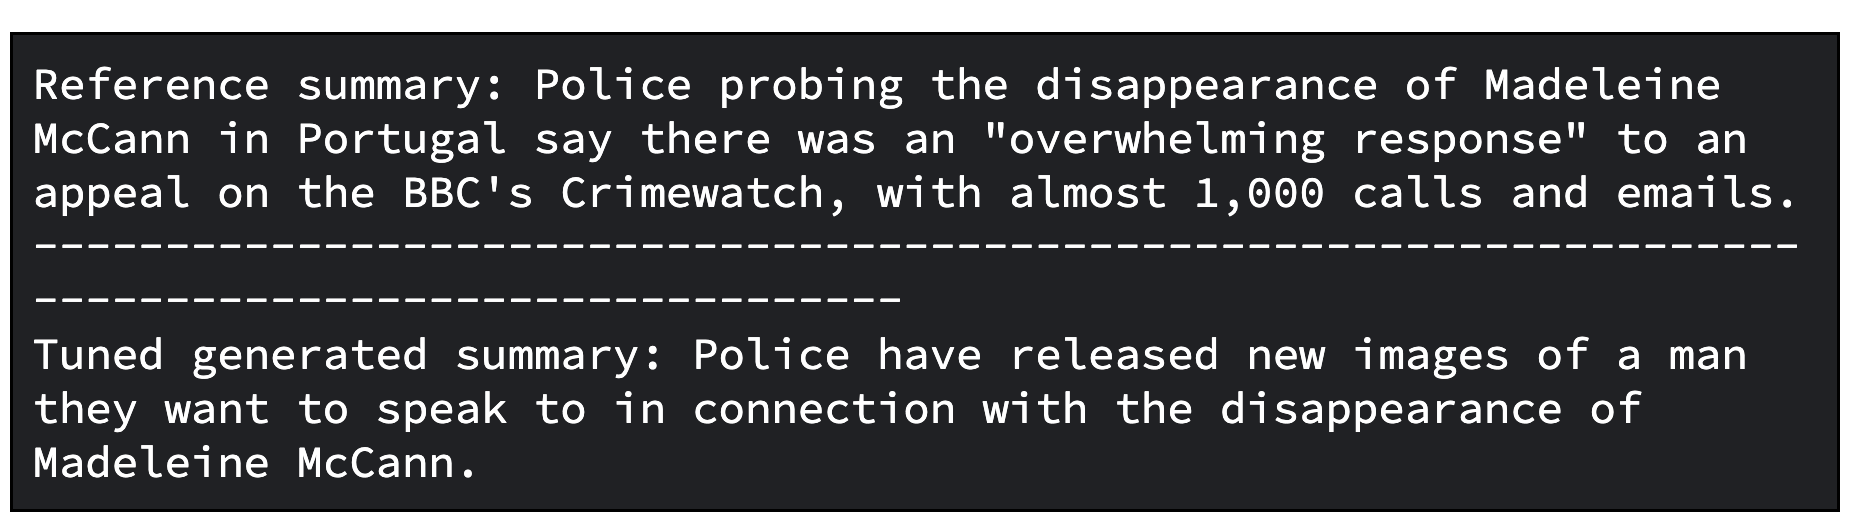
print(f"Reference summary: {reference_summary}")
print("-" * 100)
print(f"Tuned generated summary: {generated_tuned_gemma_summary}")下面是经过调整的模型的示例输出。请注意,经过调整的结果可能需要进一步优化。为了获得最佳质量,您需要多次迭代整个过程,进而调整学习率和训练步骤数等因素。
作为额外的步骤,您可以评估经过调整的模型。为了评估模型,您需要对模型进行定性和定量比较。
在一种情况下,您需要将基础 Gemma 模型生成的响应与经过调整的 Gemma 模型生成的响应进行比较。在另一种情况下,您需要计算 ROUGE 指标及其提高幅度,以便了解经过调整的模型与基础模型相比在正确再现引用摘要方面的表现。
下面是 Python 代码,用于通过比较生成的摘要来评估模型。
gemma_pipeline = pipeline(
"text-generation", model=base_model, tokenizer=tokenizer, max_new_tokens=50
)
generated_gemma_summary = gemma_pipeline(
prompt, do_sample=True, temperature=0.1, add_special_tokens=True
)[0]["generated_text"][len(prompt) :]
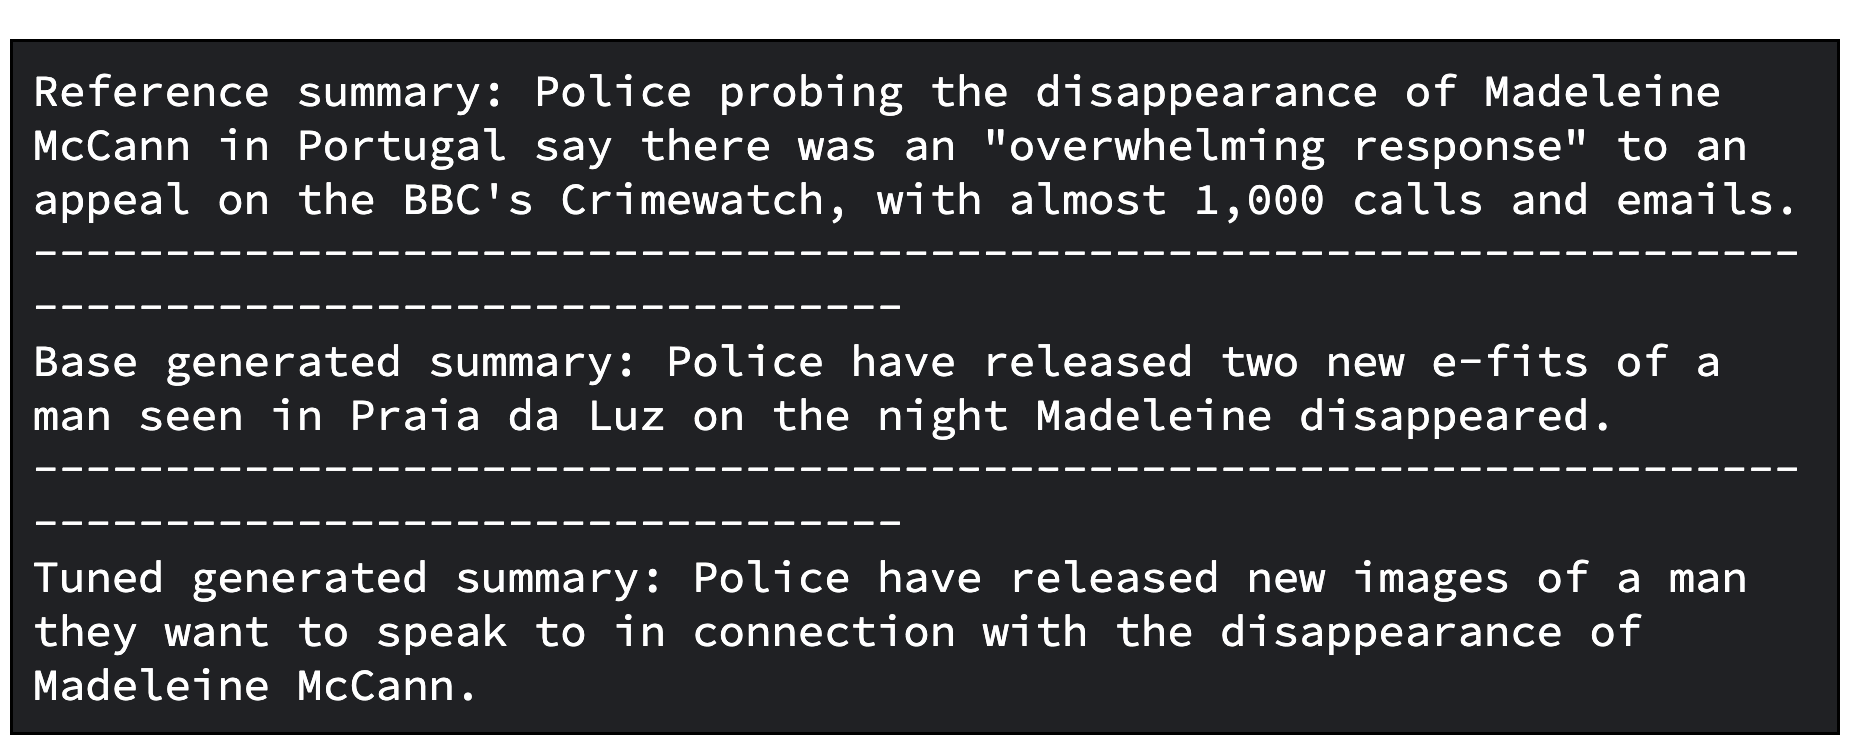
print(f"Reference summary: {reference_summary}")
print("-" * 100)
print(f"Base generated summary: {generated_gemma_summary}")
print("-" * 100)
print(f"Tuned generated summary: {generated_tuned_gemma_summary}")下面是基础模型和经过调整的模型的示例输出。
下面是通过计算 ROUGE 指标及其提高幅度来评估模型的代码。
import evaluate

rouge = evaluate.load("rouge")

gemma_results = rouge.compute(
    predictions=[generated_gemma_summary],
    references=[reference_summary],
    rouge_types=["rouge1", "rouge2", "rougeL", "rougeLsum"],
    use_aggregator=True,
    use_stemmer=True,
)

tuned_gemma_results = rouge.compute(
    predictions=[generated_tuned_gemma_summary],
    references=[reference_summary],
    rouge_types=["rouge1", "rouge2", "rougeL", "rougeLsum"],
    use_aggregator=True,
    use_stemmer=True,
)

improvements = {}
for rouge_metric, gemma_rouge in gemma_results.items():
    tuned_gemma_rouge = tuned_gemma_results[rouge_metric]
    if gemma_rouge != 0:
        improvement = ((tuned_gemma_rouge - gemma_rouge) / gemma_rouge) * 100
    else:
        improvement = None
    improvements[rouge_metric] = improvement

print("Base Gemma vs Tuned Gemma - ROUGE improvements")
for rouge_metric, improvement in improvements.items():
print(f"{rouge_metric}: {improvement:.3f}%")以及用于评估的示例输出。

要利用 Ray on Vertex AI 上经过调整的 Gemma 大规模生成离线预测,您可以使用 Ray Data,这是一个用于 ML 工作负载的可扩展数据处理库。
要结合使用 Ray Data 与 Gemma 生成离线预测,您需要定义一个 Python 类才能在 Hugging Face Pipeline 中加载经过调整的模型。然后,根据您的数据源及其格式,您需要使用 Ray Data 执行分布式数据读取,并使用 Ray 数据集方法应用 Python 类,以对多批数据并行执行预测。
要使用经过 Vertex AI 上的 Ray Data 调整的模型生成批量预测,您需要利用可生成预测的数据集和存储在 Cloud 存储分区中的经过调整的模型。
然后,您可以利用 Ray Data,它为离线批量推理提供了易于使用的 API。
首先,使用 Google Cloud CLI 将经过调整的模型上传到 Cloud Storage
gsutil -q cp -r “./models” “your-bucket-uri/models”准备用于执行 Ray 批量预测作业的批量预测训练脚本文件。
同样,您可以启动客户端,使用 Ray Jobs API 通过 Ray 仪表板地址提交作业,如下所示。
import ray
from ray.job_submission import JobSubmissionClient

client = JobSubmissionClient(
    address="vertex_ray://{}".format(ray_cluster.dashboard_address)
)我们来设置一些作业配置,包括模型路径、作业 ID、预测进入点等。
import random, string

batch_predict_submission_id = "your-batch-prediction-job"
tuned_model_uri_path = "/gcs/your-bucket-uri/models"
batch_predict_entrypoint = f"python3 batch_predictor.py --tuned_model_path={tuned_model_uri_path} --num_gpus=1 --output_dir=”your-bucket-uri/predictions”"
batch_predict_runtime_env = {
    "working_dir": "tutorial/src",
    "env_vars": {"HF_TOKEN": “your-hf-token”},
}您可以通过“--num_gpus”参数指定要使用的 GPU 数量。此值应等于或小于 Ray 集群中可用的 GPU 数量。
并提交作业。
batch_predict_job_id = client.submit_job(
    submission_id=batch_predict_submission_id,
    entrypoint=batch_predict_entrypoint,
    runtime_env=batch_predict_runtime_env,
)让我们快速查看使用 Pandas DataFrame 生成的摘要。
import io
import pandas as pd
from google.cloud import storage
def read_json_files(bucket_name, prefix=None):
"""从 Cloud Storage 存储分区读取 JSON 文件并返回 Pandas DataFrame"""
# 设置 Storage 客户端
storage_client = storage.Client()
bucket = storage_client.bucket(bucket_name)
blobs = bucket.list_blobs(prefix=prefix)
dfs = []
for blob in blobs:
if blob.name.endswith(".json"):
file_bytes = blob.download_as_bytes()
file_string = file_bytes.decode("utf-8")
with io.StringIO(file_string) as json_file:
df = pd.read_json(json_file, lines=True)
dfs.append(df)
return pd.concat(dfs, ignore_index=True)
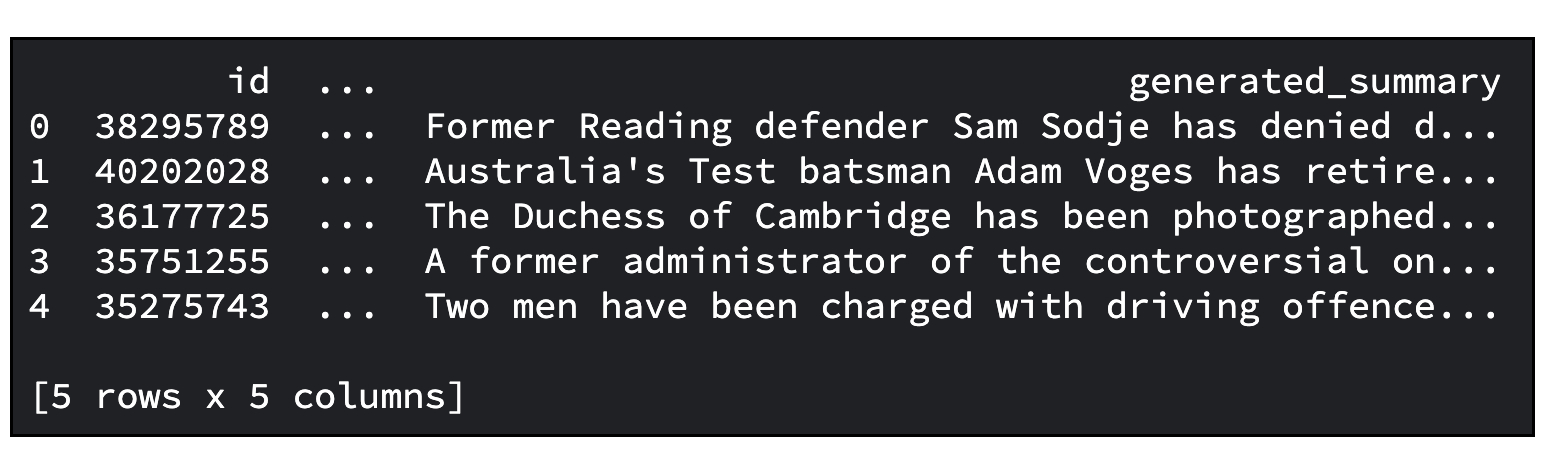
predictions_df = read_json_files(prefix="predictions/", bucket_name=”your-bucket-uri”)
predictions_df = predictions_df[
["id", "document", "prompt", "summary", "generated_summary"]
]
predictions_df.head()下面是一个示例输出。要总结的文章默认数量为 20 篇。您可以使用“--sample_size”参数指定数量。
现在,您已学习了很多内容,包括:
我们希望本教程可让您受到启发,并为您提供宝贵的见解。
请考虑加入 Google 开发者社区 Discord 服务器。您将有机会分享自己的项目、与其他开发者建立联系并参与合作讨论。
别忘了清理此项目用到的所有 Google Cloud 资源。您只需删除本教程中使用的 Google Cloud 项目即可。或者,您也可以删除您自己创建的各项资源。
# 删除 Tensorboard
tensorboard_list = vertex_ai.Tensorboard.list()
for tensorboard in tensorboard_list:
    tensorboard.delete()

# 删除实验
experiment_list = vertex_ai.Experiment.list()
for experiment in experiment_list:
    experiment.delete()

# 删除 Vertex 集群中的 Ray
ray_cluster_list = vertex_ray.list_ray_clusters()
for ray_cluster in ray_cluster_list:
vertex_ray.delete_ray_cluster(ray_cluster.cluster_resource_name)# 删除工件库
gcloud artifacts repositories delete “your-repo” -q
# 删除已创建的 Cloud Storage 对象
gsutil -q -m rm -r “your-bucker-uri”