
Posted by Sean Kirmani, Software Engineering Intern, Tango
Augmented reality scenes, where a virtual object is placed in a real environment, can surprise and delight people whether they’re playing with dominoes or trying to catch monsters. But without support for environmental lighting, these virtual objects can stick out rather than blend in with their environments. Ambient lighting should bleed onto an object, real objects should be seen in reflective surfaces, and shade should darken a virtual object.
Tango-enabled devices can see the world like we do, and they’re designed to bring mobile augmented reality closer to real reality. To help bring virtual objects to life, we’ve updated the Tango Unity SDK to enable developers to add environmental lighting to their Tango apps. Here’s how to get started:
Before we begin, you’ll need to download the Tango Unity SDK. Then you can follow the steps below to make your reality a little brighter.
Step 1: Create a new Unity project and import the Tango SDK package into the project.
Step 2: Create a new scene. If you need help with this, check out the solar system tutorial from a previous post. Then you’ll add Tango Manager and Tango AR Camera prefabs to your scene and remove the default Main Camera game object. Also remove the artificial directional light. We won’t need that anymore. After doing this, you should see the scene hierarchy like this:

Step 3: In the Tango Manager game object, you’ll want to check Enable Video Overlay and set the method to Texture and Raw Bytes.

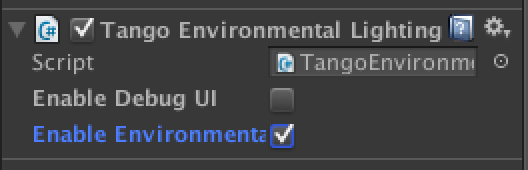
Step 4: Under Tango AR Camera, look for the Tango Environmental Lighting component. Make that the the Enable Environmental Lighting checkbox is checked.
Step 5: Add your game object that you’d like to be environmental lit to the scene. In our example, we’ll be using a pool ball. So let’s add a new Sphere.
Step 6: Let’s create a new material for our sphere. Go to Create > Material. We’ll be using our environmental lighting shader on this object. Under Shader, select Tango > Environmental Lighting > Standard.

Step 7: Let’s add a texture to our pool ball and tweak our smoothness parameter. The higher the smoothness, the more reflective our object becomes. Rougher objects have more of a diffuse lighting that is softer and spreads over the surface of the object. You can download the pool_ball_texture and import it into your project.

Step 8: Add your new material to your sphere, so you have a nicer looking pool ball.
Step 9: Compile and run the application again. You should able see environment lit pool ball now!
You can also follow our previous post and be able to place your pool ball on surfaces. You don’t have to worry about your sphere rolling off your surface. Here are some comparison pictures of the pool ball with a static artificial light (left) and with environment lighting (right).

We hope you enjoyed this tutorial combining the joy of environmental lighting with the magic of AR. Stay tuned to this blog for more AR updates and tutorials!
You’ve just created a more realistically light pool ball that live in AR. That’s a great start, but there’s a lot more you can do to make a high performance smartphone AR application. Check out our Unity example code on Github (especially the Augmented Reality example) to learn more about building a good smartphone AR application.