
Earlier this year, we announced the general availability of third-party smart chips in Google Docs. This new feature lets you add, view, and engage with critical information from third party apps directly in Google Docs. Several partners, including Asana, Atlassian, Figma, Loom, Miro, Tableau, and Whimsical, have already created smart chips so users can start embedding content from their apps directly into Docs. Sourabh Choraria, a Google Developer Expert for Google Workspace and hobby developer, published a third-party smart chip solution called “Link Previews” to the Google Workspace Marketplace. This app adds information to Google Docs from multiple commonly used SaaS tools.
In this blog post you will find out how you too can create your own smart chips for Google Docs.
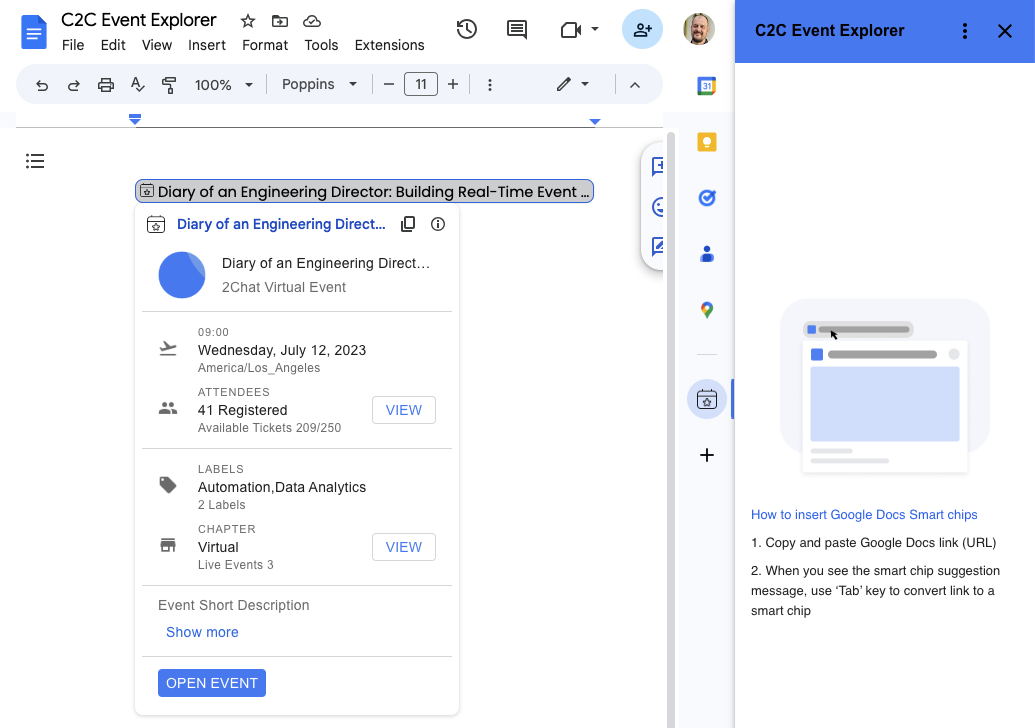
Third-party smart chips are powered by Google Workspace Add-ons and can be published to the Google Workspace Marketplace. From there, an admin or user can install the add-on and it will appear in the sidebar on the right hand side of Google Docs.
The Google Workspace Add-on detects a service's links and prompts Google Docs users to preview them. This means that you can create smart chips for any service that has a publicly accessible URL. You can configure an add-on to preview multiple URL patterns, such as links to support cases, sales leads, employee profiles, and more. This configuration is done in the add-on’s manifest file.
{
  "timeZone": "America/Los_Angeles",
  "exceptionLogging": "STACKDRIVER",
  "runtimeVersion": "V8",
  "oauthScopes": [
    "https://www.googleapis.com/auth/workspace.linkpreview",
    "https://www.googleapis.com/auth/script.external_request"
  ],
  "addOns": {
    "common": {
      "name": "Preview Books Add-on",
      "logoUrl": "https://developers.google.com/workspace/add-ons/images/library-icon.png",
      "layoutProperties": {
        "primaryColor": "#dd4b39"
      }
    },
    "docs": {
      "linkPreviewTriggers": [
        {
          "runFunction": "bookLinkPreview",
          "patterns": [
            {
              "hostPattern": "*.google.*",
              "pathPrefix": "books"
            },
            {
              "hostPattern": "*.google.*",
              "pathPrefix": "books/edition"
            }
          ],
          "labelText": "Book",
          "logoUrl": "https://developers.google.com/workspace/add-ons/images/book-icon.png",
          "localizedLabelText": {
            "es": "Libros"
          }
        }
      ]
    }
  }
}The manifest file contains the URL pattern for the Google Books API
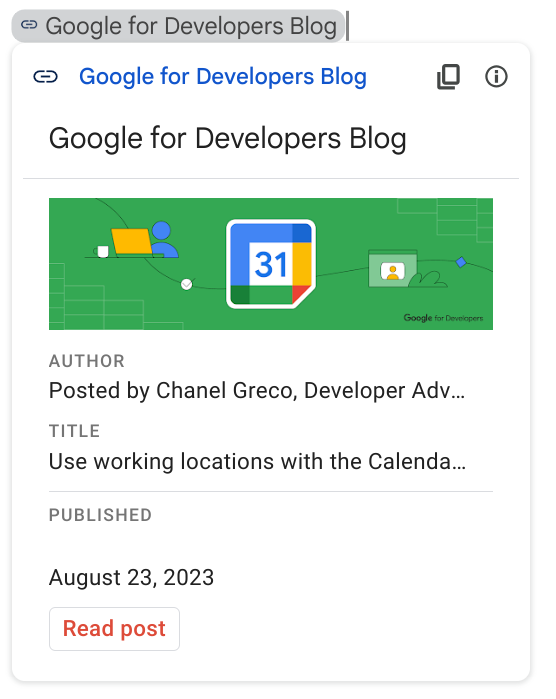
The smart chip displays an icon and short title or description of the link's content. When the user hovers over the chip, they see a card interface that previews more information about the file or link. You can customize the card interface that appears when the user hovers over a smart chip. To create the card interface, you use widgets to display information about the link. You can also build actions that let users open the link or modify its contents. For a list of all the supported components for preview cards check the developer documentation.
function getBook(id) {
// Code to fetch the data from the Google Books API
}

function bookLinkPreview(event) {
 if (event.docs.matchedUrl.url) {
// Through getBook(id) the relevant data is fetched and used to build the smart chip and card

    const previewHeader = CardService.newCardHeader()
      .setSubtitle('By ' + bookAuthors)
      .setTitle(bookTitle);

    const previewPages = CardService.newDecoratedText()
      .setTopLabel('Page count')
      .setText(bookPageCount);

    const previewDescription = CardService.newDecoratedText()
      .setTopLabel('About this book')
      .setText(bookDescription).setWrapText(true);

    const previewImage = CardService.newImage()
      .setAltText('Image of book cover')
      .setImageUrl(bookImage);

    const buttonBook = CardService.newTextButton()
      .setText('View book')
      .setOpenLink(CardService.newOpenLink()
        .setUrl(event.docs.matchedUrl.url));

    const cardSectionBook = CardService.newCardSection()
      .addWidget(previewImage)
      .addWidget(previewPages)
      .addWidget(CardService.newDivider())
      .addWidget(previewDescription)
      .addWidget(buttonBook);

    return CardService.newCardBuilder()
    .setHeader(previewHeader)
    .addSection(cardSectionBook)
    .build();
  }
}This is the Apps Script code to create a smart chip.
For a detailed walkthrough of the code used in this post, please checkout the Preview links from Google Books with smart chips sample tutorial.
When creating smart chips for link previewing, you can choose from two different technologies to create your add-on: Google Apps Script or alternate runtime.
Apps script is a rapid application development platform that is built into Google Workspace. This fact makes Apps Script a good choice for prototyping and validating your smart chip solution as it requires no pre-existing development environment. But Apps Script isn’t only for prototyping as some developers choose to create their Google Workspace Add-on with it and even publish it to the Google Workspace Marketplace for users to install.
If you want to create your smart chip with Apps Script you can check out the video below in which you learn how to build a smart chip for link previewing in Google Docs from A - Z. Want the code used in the video tutorial? Then have a look at the Preview links from Google Books with smart chips sample page.
Link to Youtube Video (visible only when JS is disabled)
If you prefer to create your Google Workspace Add-on using your own development environment, programming language, hosting, packages, etc., then alternate runtime is the right choice. You can choose from different programming languages like Node.js, Java, Python, and more. The hosting of the add-on runtime code can be on any cloud or on premise infrastructure as long as runtime code can be exposed as a public HTTP(S) endpoint. You can learn more about how to create smart chips using alternate runtimes from the developer documentation.
You can share your add-on with others through the Google Workspace Marketplace. Let’s say you want to make your smart chip solution available to your team. In that case you can publish the add-on to your Google Workspace organization, also known as a private app. On the other hand, if you want to share your add-on with anyone who has a Google Account, you can publish it as a public app.
To find out more about publishing to the Google Workspace Marketplace, you can watch this video that will walk you through the process.
Learn more about creating smart chips for link previewing in the developer documentation. There you will find further information and code samples you can base your solution of. We can’t wait to see what smart chip solutions you will build.

All the news from the Google I/O 2026 Developer keynote

One Year of Innovation: Celebrating 100k Members in the Google Cloud x NVIDIA Developer Community

Supercharging LLM inference on Google TPUs: Achieving 3X speedups with diffusion-style speculative decoding

New enhancements for merchant initiated transactions with the Google Pay API